
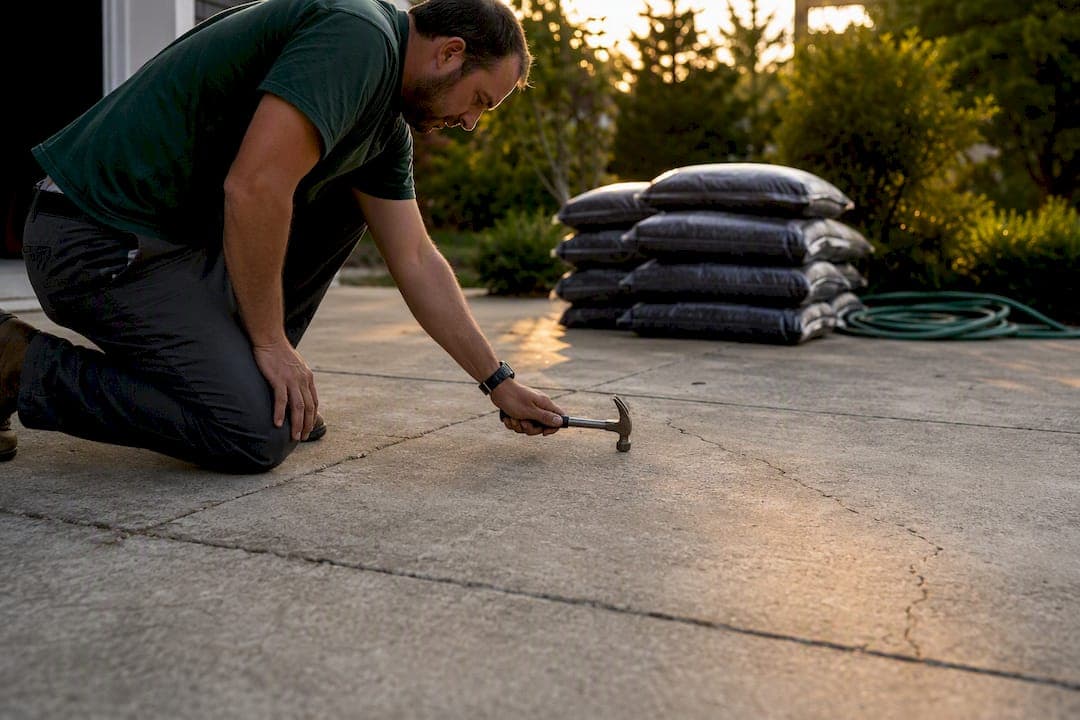
Yes, you can install rubber paving over concrete in most cases, but only if the slab underneath is structurally sound, dry, and properly profiled before anything goes down. You'll choose between a bonded overlay (poured-in-place or adhesive-set pavers) or an interlocking loose-lay system, and whichever route you pick, the same three things sink a project: trapped moisture, slab movement, and skipped surface prep.
TL;DR:
- A concrete slab suitable for rubber paving must be structurally sound, dry, flat, and free of deep cracks or settlement issues before installation.
- Surface preparation requires thorough cleaning, mechanical profiling, and crack repair to ensure proper adhesion and prevent failures.
- Thicker systems like heavy-duty pavers or poured overlays are necessary for vehicle traffic and freeze-thaw durability, while thin coatings suit foot traffic only.
- Proper drainage and well-designed edges, transitions, and joint treatments are critical to avoiding water damage and surface cracking over time.
- DIY installation is feasible on small, stable slabs, but structural repairs or complex drainage situations demand licensed professional installation with proper scope and warranty.
Table of Contents
- Is Your Concrete a Good Candidate for Rubber Paving Over Concrete?
- Materials and System Options: Pavers, Overlays, and Coatings
- How to Install Rubber Paving Over Concrete Step by Step
- Drainage, Joints, and Edge Details That Prevent Failure
- Maintenance, Lifespan, and What Drives Cost
- When to Hire a Pro for Rubber Paving Over Concrete
- My Take: The Simple Way to Decide
- Get a Professional Rubber Paving Estimate
- Sources
Is Your Concrete a Good Candidate for Rubber Paving Over Concrete?
Before you buy a single bag of granules, walk your slab and look for trouble. Structural red flags include heaving sections, hollow-sounding spots when you tap with a hammer, and areas where one side of a joint sits noticeably lower than the other. Any of those point to a settlement or drainage problem that needs fixing first, not covering up.
Moisture matters just as much as cracks. A simple plastic sheet test (tape a 2 by 2 foot sheet down overnight and check for condensation underneath) tells you if the slab is still off gassing water that will wreck an adhesive bond. Hairline cracks under about 1/8 inch that aren't moving are cosmetic and easy to fill. Cracks wider than that, or ones that shift with temperature, usually need epoxy injection or full patching before overlay work starts.
Run through this before you commit:
- No hollow spots or heaving when tapped or walked
- Slab passes an overnight moisture check
- Cracks are stable and under 1/8 inch, or already repaired
- Surface is free of oil, sealer, or paint film
- Drainage already slopes away from structures
Materials and System Options: Pavers, Overlays, and Coatings
Three main product families handle rubber paving over concrete, and each fits a different job. Poured-in-place overlays use recycled rubber granules mixed with a polyurethane binder, troweled or sprayed on site to cure into a seamless, slip-resistant surface. Rubber pavers come either adhesive-bonded in roughly 1 inch thickness for a low-profile patio finish, or as thicker interlocking tiles around 1 and 3/4 inches that can be loose-laid in some settings without full bonding, according to installation guidance from Blue Sky Fitness Supply. Thin rubber coatings sit at the lightest end, adding texture and slip resistance without meaningfully changing elevation.
Thickness drives durability more than most homeowners expect. A thin coating handles foot traffic fine but won't survive a driveway. Full-depth pavers or a thicker poured overlay hold up under vehicle loads and repeated freeze-thaw cycles.
- Pool decks and patios: poured-in-place overlay or adhesive-bonded pavers for consistent footing when wet
- Garage floors: thin coatings or bonded overlays, since ceiling clearance is often tight
- Driveways: thicker poured systems or heavy-duty pavers rated for vehicle traffic
How to Install Rubber Paving Over Concrete Step by Step
Getting this right is less about talent and more about sequence. Skip a step and the whole system loses its grip.
- Clean and degrease thoroughly. Pressure wash the slab, then use a concrete degreaser on any oil or tire marks. DIY installation guides treat this as the non-negotiable first move, and skipping it is the single most common reason bonds fail early.
- Mechanically profile the surface. Rent a diamond grinder or hire a shot-blasting pass. This roughens the slab so the binder has something to grab onto rather than sitting on a slick, sealed surface.
- Repair cracks and low spots. Fill stable cracks with a flexible epoxy filler, patch spalled areas, and level dips with a concrete leveling compound. Let repairs cure fully before moving on.
- Prime the slab. Apply the manufacturer-specified primer within the recommended window, usually while temperatures sit in a moderate range. Cold or damp conditions extend open time and can weaken the bond.
- Set the adhesive and lay the system. For bonded pavers, spread polyurethane adhesive with the notched trowel size the manufacturer specifies, then seat each paver with hand pressure or a rubber mallet, checking alignment as you go. For poured systems, mix and trowel the rubber and binder blend to a consistent depth in sections small enough to finish before it sets.
- Finish edges and transitions. Use reducer strips at garage thresholds and stair nosings so the new surface doesn't leave a trip hazard.
- Let it cure before use. Light foot traffic is usually fine within 24 hours, but full cure for vehicle weight or heavy use can take several days depending on temperature and humidity.
Pro Tip: Work in the coolest part of the day during summer installs. Polyurethane binders set faster in heat, and you'll lose working time before you've finished troweling a section.
Drainage, Joints, and Edge Details That Prevent Failure
Water management makes or breaks a rubber overlay long before wear and tear does. Check that your slab already sheds water away from the house; a slope of roughly 1/4 inch per foot is the standard target, and you can confirm it with a level and a straightedge before committing to overlay work.
- Terminate edges at garage thresholds and stairs with reducer strips, not raw cut edges
- Seal the perimeter where the overlay meets lawn or landscaping to block water intrusion underneath
- Respect existing control and expansion joints. Cutting matching joints into the overlay keeps concrete movement from cracking the rubber surface above it
- Call a professional if drainage correction requires regrading or adding a drain, since that's beyond a weekend DIY fix
Contractors working on driveways and patios often show this kind of edge and drainage detailing in recent hardscaping project galleries, which is worth a look if you want a visual reference before tackling your own transitions.
Maintenance, Lifespan, and What Drives Cost
A properly installed rubber overlay commonly lasts 20 years or more when the prep work was done right. What shortens that life: prolonged UV exposure without a UV-stable topcoat, oil and gas spills left untreated, repeated freeze-thaw cycling in unsealed edges, and vehicle loads on a system rated only for foot traffic.

Routine upkeep is light. Sweep debris regularly, rinse with a garden hose or low-pressure washer a few times a year, and reseal every few years depending on sun exposure. Budget-wise, the biggest cost swings come from repair scope, drainage corrections, overlay thickness, and finish complexity like custom color blends or stair details. When comparing quotes, ask what warranty covers delamination versus surface wear, and treat a quote with no mention of profiling or crack repair as a red flag.

When to Hire a Pro for Rubber Paving Over Concrete
DIY works well for small, sound slabs with simple geometry. Call a licensed contractor when you're dealing with structural slab damage, ADA-compliant ramp requirements, complex drainage corrections, or a driveway that needs to handle daily vehicle loads. A qualified installer's scope should always include mechanical profiling, engineered crack repair, and a written warranty, backed by proper licensing and insurance. Ecotecrubber's Rubberway® system is built around exactly that kind of scoped, professional installation.
My Take: The Simple Way to Decide
Most homeowners overthink this. If your slab passes the checklist above, DIY a bonded overlay on a patio or small walkway. If you're seeing structural damage, drainage problems, or the project touches a driveway or ADA ramp, hire a licensed pro instead of gambling on a redo. Two questions settle it: is the slab ready, or does it need repair? Is the job simple, or does it need an engineer's eye?
— Roger
Get a Professional Rubber Paving Estimate
If your slab needs structural repair, complex drainage work, or you'd rather skip the rental-equipment weekend entirely, Ecotecrubber handles the whole job with the Rubberway® system, from profiling through final cure, backed by licensed and insured crews across its Florida service area.
Before requesting a quote, take a few photos of your slab (including any cracks or low spots), measure the square footage, and note anything you already know is wrong, like standing water or a section that heaves in summer. That gives an estimator everything needed to scope the job accurately on the first visit. Compare material options on the Rubberway® product page, or head straight to Ecotecrubber's site to request your estimate.
Sources
For hands-on prep steps, see the DIY installation checklist. For a technical look at bonded overlays, read Rubber Resurfacing Over Concrete: Worth It?
- Rubber Resurfacing Over Concrete: Worth It?
- Rubber Stone | Slip-Resistant Rubber Patio & Pool Deck Overlay