
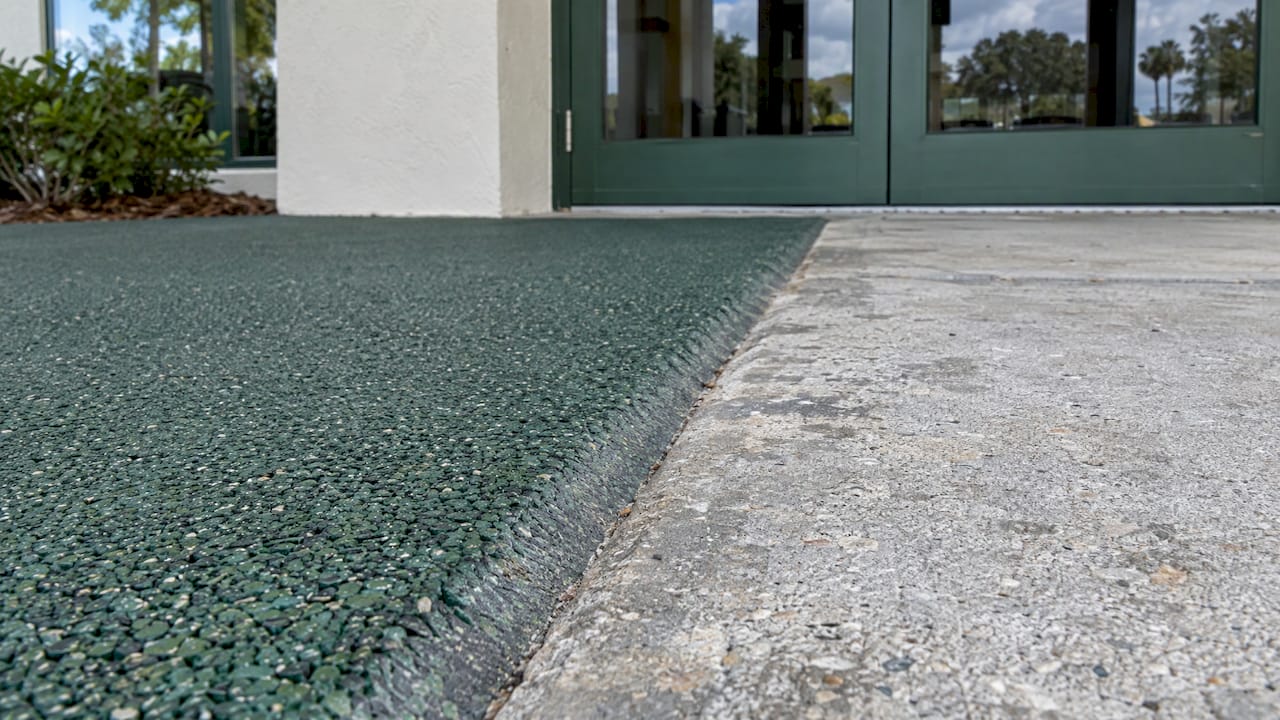
A good transition from rubber paving to concrete is flush or nearly flush, bonded along its whole length, free to drain and built to move with the slab. The seam is where most surfacing problems start, because it is where two materials with different expansion, different heights and different drainage meet. Get it right at design stage and you never think about it again. Get it wrong and you have a trip hazard, a lifted edge or a puddle. We install Rubberway® rubber paving across Florida, and this guide covers what to specify so the edge between rubber and concrete works for homeowners, HOAs, businesses and municipalities.
TL;DR
- Keep any height difference at the joint to ¼ inch or less. Between ¼ and ½ inch it must be beveled, and above ½ inch it is a ramp, per the US Access Board's ADA guide.
- The concrete edge decides how long the bond lasts: cured, clean, dry, free of sealers and free of hydrostatic pressure.
- Use a moisture-cured urethane-type adhesive or a bonded edge detail rated for outdoor use, never a general-purpose glue.
- Plan for slab movement and drainage at the seam, so water leaves through the edge instead of sitting under it.
- Specify the transition in the contract, with the heights and drainage details written down, and inspect it each year.
Table of Contents
- What the transition has to do
- The ADA height rules at the joint
- Prepare the concrete edge first
- Adhesive and bonding: what the data sheets say
- Drainage and joint details at the seam
- Movement, heat and the Florida climate
- Keeping the transition in shape
- Our view on the transition
- Have us design and build the edge
- FAQ
- Sources
What the transition has to do
The seam between rubber and concrete has four jobs at once.
- Stay level. Pedestrians, wheelchairs, strollers, golf carts and delivery carts all cross it. A raised lip is the usual cause of a trip.
- Stay bonded. The rubber edge must not peel, curl or creep away from the concrete under foot traffic, sun and rain.
- Let water through. Porous rubber is chosen for drainage. A seam that dams water at the edge defeats the point.
- Absorb movement. Concrete expands and contracts with temperature and moisture. The seam needs a way to take that movement without cracking the rubber or breaking the bond.
Those four jobs are the checklist for everything below. If a proposed detail fails one, ask how it will be handled before you sign.
The ADA height rules at the joint
If the path is a public or commercial accessible route, the seam is covered by the ADA, the federal civil rights law that sets accessibility rules for public and commercial facilities. The 2010 ADA Standards became mandatory for new and altered facilities on March 15, 2012. The rules for changes in level are short and worth memorizing, as summarized in the Access Board's Guide to the ADA Standards:
| Height difference at the seam | What the standard requires |
|---|---|
| Up to ¼ inch | Allowed with no treatment |
| Over ¼ inch up to ½ inch | Must be beveled, with a slope no steeper than 1:2 |
| Over ½ inch | Must be treated as a ramp or curb ramp |
The same guide requires floor and ground surfaces on accessible routes to be stable, firm and slip-resistant. It also warns that gaps or openings wider than ½ inch between paving units should be avoided or treated, especially where they run parallel to the direction of travel, because recessed joints can disrupt wheelchair maneuvering even when the level change is under ¼ inch.
A worked example. An HOA replaces a cracked concrete sidewalk section beside the pool with rubber paving. The new rubber surface finishes 3/8 inch above the old slab. That is between ¼ and ½ inch, so the edge must be beveled at 1:2 or flatter, which means the bevel runs at least ¾ inch horizontally for the 3/8 inch rise. Planned in advance, that is trivial. Discovered after installation, it means grinding or re-pouring. The cheaper fix is to set the finished elevation right the first time.
For a deeper look at the standard, see our guides on how rubber paving meets ADA standards and ADA slip resistance requirements. If you are retrofitting an existing commercial path, our commercial walkway retrofit guide covers the wider rules.
Prepare the concrete edge first
Most failed transitions are failed preparation. Adhesive technical data sheets are specific about the surface they bond to. Bostik's data sheet for its LOCK P799 I/O rubber adhesive, a moisture-cured urethane, is a good example of what manufacturers ask for:
- A slab temperature between 40 and 100°F during installation.
- No wet, dusty or contaminated substrate.
- No sealer-treated concrete.
- No hydrostatic head, meaning water pressure pushing up through the slab from the ground.
- Moisture testing to ASTM F2170, a standard in-slab relative humidity test.
- No heavy traffic or rolling loads for at least 24 hours after installation.
In practice that translates into a handful of questions for any slab you want a rubber edge against:
Is the concrete cured? New concrete holds moisture. Waiting until it has cured and dried is not optional for an adhesive bond.
Is it sound? Cracks, spalls and broken edges need repair before surfacing. A rubber layer does not bridge a failing slab edge.

Is it clean? Oil, paint, curing compound, old sealer and dust all stop adhesive from gripping. Pool decks and driveways often carry all of these.
Does water come up from below? If groundwater or irrigation pushes moisture through the slab, the bond will fail however good the adhesive is. This is common beside pools and in low Florida lots, and it is why the site assessment matters more than the product.
Our article on the role of surface prep in rubber paving success goes through the preparation side in more detail.
Adhesive and bonding: what the data sheets say
For outdoor rubber against concrete, the adhesive families you will see specified are moisture-cured polyurethane (urethane) products and, for specific bonding jobs, neoprene contact adhesives. What matters is the rating, not the brand name:
- Rated for outdoor exposure. Bostik's data sheet states its urethane is not adversely affected by moisture once cured and is rated for indoor or outdoor use.
- Permanent elasticity. Sika's data sheet for SikaBond Construction Adhesive describes a one-component exterior polyurethane that stays permanently elastic after cure and is waterproof after cure. It gives a service temperature range of −40 to 170°F, which comfortably covers a sun-baked Florida surface, and a cure time of 5 to 7 days.
- Cure time before loading. Cure windows run from 24 hours before light traffic up to a week for full cure, depending on the product. The schedule needs to keep vehicles and carts off the seam until then.
That is why a household product like rubber cement or a general construction glue is a poor fit for a seam that sees weather. Elasticity, outdoor rating and moisture tolerance are the three properties to look for, and the project specification should name them.
Can you see the problem with treating adhesive as the whole answer? A perfect adhesive on a damp, sealed or dusty slab still fails. The bond is a system: surface, adhesive, temperature on the day, cure time and loading.
Drainage and joint details at the seam
Water is the second reason seams fail. Porous rubber paving drains vertically through the surface. If the concrete next to it is sloped to shed water onto the rubber, or if the seam is sealed solid with adhesive, water collects where the two meet.
Two published specifications show how seriously bonded edges are treated in the paving industry:
- A technical data sheet for a paver bonding adhesive from SEK directs installers to pre-wet the concrete base to damp without pooling, and to remove excess adhesive about 0.5 to 1 inch back from the edges of paving units so the joints keep draining.
- The Concrete Masonry & Hardscapes Association guide specification for pavers adhered to concrete sets joint widths of 1/16 to 3/16 inch, limits bond-line deviation to ±½ inch over 50 feet, and requires pavers to sit 1/8 inch above adjacent drainage inlets, concrete collars or channels.
These are specifications for pavers, not for poured rubber, but the principle carries over: keep adhesive out of the drainage path, hold tight tolerances on lines and heights, and set the surface so water runs toward a drain and not into a pocket. When you review a design, ask where water leaves the surface at the seam and where the surrounding concrete slopes.
For drainage design, our guides on porous rubber paving drawdown specs and porous sidewalk drainage explain how a porous surface is meant to drain.
Movement, heat and the Florida climate
Concrete slabs move. Heat expands them, cooling and drying contract them, and joints between slabs exist for that reason. A rubber edge bonded rigidly across a working concrete joint will eventually be stressed. Three habits reduce the risk:
- Align the seam with existing joints. Where possible, finish the rubber at a concrete control joint so the movement happens in the joint and not under the rubber.
- Use an elastic bond. An adhesive that stays flexible after cure, like the exterior polyurethane described above, tolerates small movement better than a rigid one.
- Do not install in poor conditions. The Bostik range of 40 to 100°F for slab temperature is a reminder that midday summer slabs and wet-season mornings are both bad times to bond.
Rubberway surfaces are designed for Florida's climate, with drainage that deals with standing water and crack resistance against heat. The seam deserves the same attention as the field of the surface, because heat and water attack it first.
Keeping the transition in shape
Once cured, a transition needs very little. A simple annual routine is enough for most properties:
- Walk the full length of the seam and look for lifted edges, hairline separation, or debris packed into the joint.
- Clear leaves, sand and mulch from the edge so water can leave the surface.
- Check the height difference. If settlement or tree roots have raised the concrete or dropped the rubber past ¼ inch, the ADA treatment rule applies again.
- Report any edge that begins to lift early. A small area re-bonded now is a minor job. A long lifted section catches mower decks, cart wheels and shoes.
For a municipal or HOA path, put the seam inspection in your regular site-walk checklist and record the date. That record is useful documentation if a complaint is ever raised about an accessible route.
Our view on the transition
We treat the seam as part of the design, not as an afterthought at the end of a job. Most of the problems people describe with rubber meeting concrete come down to three things decided before anyone mixes material: the height of the finished surface against the slab, the condition of the concrete edge, and where the water goes.
That is why we specialize only in rubber paving. Our installations use the Rubberway® system with recycled tire material, a porous design for drainage, crack resistance for Florida heat and ADA-compliant surfaces. We are licensed and insured, and we provide government-ready documentation for municipal and HOA projects, which matters when a board needs to show that an accessible route was built to standard.
Our advice to any board or owner is simple. Ask for the finished-height plan at every concrete edge, ask how the existing slab will be prepared, and ask how drainage is handled at the seam. Put the answers in the contract.
Roger
Have us design and build the edge
If you are replacing a walkway, pool deck, driveway or community path and the new rubber surface has to meet existing concrete, the simplest route is to have the whole job handled as one rubber paving project. EcoTec Rubber Paving installs the Rubberway® system for homeowners, businesses, municipalities, HOAs and golf courses across Florida, with ADA-compliant surfaces and a wide range of colors. You can see the surfaces on our products page or talk to us about your project.
If the path is a sidewalk or accessible route, our guide on when flexible sidewalk material beats concrete is a useful companion for planning the scope.
FAQ
What is the maximum height difference between rubber paving and concrete?
On an accessible route, up to ¼ inch needs no treatment. From ¼ to ½ inch the edge must be beveled no steeper than 1:2, and above ½ inch it must be a ramp. These limits come from the 2010 ADA Standards as summarized by the Access Board. Aim for a flush finish so you stay well inside them.
What kind of adhesive holds rubber to concrete outdoors?
Look for a moisture-cured urethane or exterior polyurethane adhesive that is rated for outdoor use and stays elastic after cure. One published example, Sika's exterior adhesive data sheet, lists a service range of −40 to 170°F. The right product for your job depends on the surface, the weather on installation day and the specified cure time, so it belongs in the project specification.
How long should I wait before using the new seam?
It depends on the adhesive. Bostik's urethane data sheet calls for at least 24 hours before heavy traffic or rolling loads, while Sika lists a 5 to 7 day cure for its exterior adhesive. Follow the schedule in your installation specification and keep carts and vehicles off until it passes.
Why does the edge of a rubber surface lift?
The usual causes are moisture rising through the slab, a contaminated or sealed concrete surface, installation in poor temperatures, and movement of the slab beneath a rigid bond. Each is a preparation or design issue, which is why they are best settled before installation.
Does the seam need to drain?
Yes. Water trapped at the seam weakens the bond and creates puddles on a path that is meant to drain. Specifications for bonded paving keep adhesive back from unit edges so joints can drain, and the same idea applies to any rubber-to-concrete edge.
Sources
- Guide to the ADA Standards, US Access Board
- 2010 ADA Standards, US Access Board
- LOCK P799 I/O Rubber technical data sheet, Bostik
- SikaBond Construction Adhesive data sheet, Sika USA
- EZ Bond technical data sheet, SEK
- Pavers adhered to concrete guide specification, CMHA